How To Build A Web3 Gravatar Clone dApp With SvelteKit and Oasis Sapphire
Created by Joe PetrakovichLately I’ve been exploring Web3 development and in particular, the Oasis Network’s Sapphire paratime.
If you’ve ever had to deal with the complexities of data encryption in your app development you might be delighted as I was when seeing how easy it is to spin up an end-to-end encrypted app using Sapphire.
As an exercise, let’s build a Gravatar-like dapp that uses Sapphire to keep your data private by default, but can be used with a link containing a wallet address to get a profile photo and profile data.
You’ll be able to disable your profile to prevent access as well.
We could use any blockchain for this kind of dapp, but by using Sapphire, your profile data is end-to-end encrypted and will only be accessible by your wallet address run against a contract getter that will decrypt the data, and if you disable it, it won’t be accessible at all. This is in stark contrast to last generation blockchains like Ethereum where access controls for data stored on-chain are only an illusion since the chain history is public.
We’ll use SvelteKit for the dapp’s profile creation/editing frontend and for the avatar API endpoint, and we’ll use Sapphire for the backend.
- Create a Hardhat starter project
- Create the contract in solidity
- Generate a SvelteKit project for the UI and API endpoints
We’ll start by spinning up a Hardhat starter typescript project for the Solidity contract.
Create a Hardhat starter project
We’ll start by spinning up a Hardhat starter typescript project for the Solidity contract.
Ensure you have NodeJS installed first, and then in your terminal, initialize the Node project with:
node init -y
Then get Hardhat:
npm install --save-dev hardhat
Once installed, use npx hardhax init and choose the Create a TypeScript project option. You can use the default answers for any questions it asks.
When it’s done creating the starter project, it conspicuously tells you you need to install more dependencies which you can do (I had to run npm install --save-dev "hardhat@^2.17.3" "@nomicfoundation/hardhat-toolbox@^3.0.0").
You can go ahead and delete the contracts/Lock.sol and the test/Lock.ts example files, as we’ll be replacing them with real ones.
Create the contract in solidity
Our solidity contract will be fairly simple for this project. We’ll build:
- A struct to represent the profile fields.
- A function for updating it.
- A couple public getters so that the frontend and API endpoints can retrieve it.
- A modifier for access control so users can disabled their profile.
Add our new contract file to the /contracts folder, I’ve chosen the name “Privatar” to pay homage to both Sapphire and Gravatar.
We can add the profile struct as well:
// SPDX-License-Identifier: UNLICENSED
pragma solidity ^0.8.9;

contract Privatar {
    struct Profile {
        string name;
        string note;
        /// @notice base64 encoded image.
        string avatar;
        bool enabled;
    }
}
Note that we’ll store the avatar image as a base64-encoded string on-chain.
Often it’s recommended to store images and other large data either off-chain or on something cheap like IPFS, but for our purposes, we’re only storing a single small ~150x150 pixel jpeg which is relatively cheap on Sapphire at the present time.
Private storage
For storage, we’ll only need one simple mapping from wallet address to profile, like so:
mapping(address => Profile) private _profiles;
By marking it private, we’ll limit access to this data to the contract itself, and since we’re deploying to Sapphire, it will be end-to-end encrypted, only visible to explicitly created getters. That’s the smart privacy that Oasis marketing refers to. Everything is encrypted by default, and we can decide what we want to be visible with intuitive and native solidity code.
Now in our case, an app like Gravatar is meant to be public so it’s not the most exciting use case, but in the scenario where a user wants to revoke access to their data, they can do so easily, where they could not on other platforms like Ethereum.
Getters and preventing access to disabled profiles
To allow access into our profile data, we’ll add two getters - one of the profile data and one for just the avatar.
We’ll also add a modifier to revert the request if the profile is disabled.
    /// @notice If a profile is disabled, access is denied unless you're the profile owner.
    modifier profileEnabledOrProfileOwner (address addr) {
        require(msg.sender == addr || _profiles[addr].enabled, "Access denied");
        _;
    }

    function getAvatar(address addr) external view profileEnabledOrProfileOwner(addr) returns (string memory) {
        return _profiles[addr].avatar;
    }

    function getProfile(address addr) external view profileEnabledOrProfileOwner(addr) returns (Profile memory) {
        return _profiles[addr];
    }
These view getters will allow our API endpoints to retrieve the data without needing to spend any crypto.
By adding the above modifier, profile data access will be denied if the profile is disabled. We still allow access if you’re the owner of the profile so that you can see the current state of it while you edit it.
Now you might ask, couldn’t someone still harvest the data while the profile is public?
They could, however, since the storage is an encrypted mapping, harvesters would need to guess the users wallet addresses. We could also use something more random as profile keys, which would make this guess-work increasingly more expensive.
A method to update your profile
Finally, we need a method to update our profile.
function updateProfile(string calldata name, string calldata note, string calldata avatar, bool enabled) external {
    Profile memory profile;
    profile.name = name;
    profile.note = note;
    profile.avatar = avatar;
    profile.enabled = enabled;

    _profiles[msg.sender] = profile;
}
Keeping it simple for our purposes, but in a production dapp you’d probably want to allow the avatar to be updated optionally, so you can update just the profile text fields or the enabled boolean, without requiring users to upload the avatar every time.
Also note the lack of a modifier, as we’ll be using msg.sender to limit updates to the caller’s own profile.
The whole contract:
// SPDX-License-Identifier: UNLICENSED
pragma solidity ^0.8.9;

contract Privatar {
    struct Profile {
        string name;
        string note;
        /// @notice base64 encoded image.
        string avatar;
        bool enabled;
    }

    mapping(address => Profile) private _profiles;

    /// @notice If a profile is disabled, access is denied unless you're the profile owner.
    modifier profileEnabledOrProfileOwner (address addr) {
        require(msg.sender == addr || _profiles[addr].enabled, "Access denied");
        _;
    }

    function getAvatar(address addr) external view profileEnabledOrProfileOwner(addr) returns (string memory) {
        return _profiles[addr].avatar;
    }

    function getProfile(address addr) external view profileEnabledOrProfileOwner(addr) returns (Profile memory) {
        return _profiles[addr];
    }

    function updateProfile(string calldata name, string calldata note, string calldata avatar, bool enabled) external {
        Profile memory profile;
        profile.name = name;
        profile.note = note;
        profile.avatar = avatar;
        profile.enabled = enabled;

        _profiles[msg.sender] = profile;
    }
}
Take note that there is nothing specific to Sapphire here. You could very well deploy this same contract to Ethereum, however you wouldn’t benefit from any of Sapphire’s automatic confidentiality.
Omitted for brevity - we could unit test our contract using Hardhat before deploying it. You can check the repo if you’d like to see how this is done.
Finally, we need to build and deploy our contract to the Sapphire testnet so we have contract ABI and address to work with on the frontend.
Deploy the contract to Sapphire Testnet
Fortunately for us, the Hardhat starter project sets us up nicely to deploy to Hardhat network, and we can make a slight modification to use Sapphire Testnet instead.
First, modify the scripts/deploy.ts script to use our Privatar contract instead of the starter’s Lock.sol:
import { ethers } from "hardhat";

async function main() {
  const [deployer] = await ethers.getSigners();
  console.log("Deploying the contracts with the account:", await deployer.getAddress());

  const Privatar = await ethers.getContractFactory("Privatar");
  const privatar = await Privatar.deploy();
  await privatar.waitForDeployment();

  console.log(`Privatar deployed to ${await privatar.getAddress()}`);
}

main().catch((error) => {
  console.error(error);
  process.exitCode = 1;
});
Then, before running it, we’ll need to tell Hardhat about the Sapphire Testnet via the hardhat.config.ts file, and then add a wallet private key that has some TEST tokens available to pay for the deployment.
First, install dotenv to the project so we can add environment variables for our keys with:
npm install dotenv --save-dev
Then add a file named .env to the root directory with a single key in it that will hold our private key
.env
PRIVATE_KEYS=your key here
To get a viable private key, export your private key from Metamask in your browser. Be careful not to use your personal crypto wallet here. What I like to do is create a brand new Chrome browser user profile with a fresh Metamask install to use only for development.
Next, update your hardhat.config.ts to include the Sapphire Testnet like so:
import '@oasisprotocol/sapphire-hardhat';
import { HardhatUserConfig } from "hardhat/config";
import "@nomicfoundation/hardhat-toolbox";

require('dotenv').config();

const config: HardhatUserConfig = {
  solidity: "0.8.19",
  networks: {
         sapphire_testnet: {
          url: "https://testnet.sapphire.oasis.dev",
          accounts: process.env.PRIVATE_KEYS?.split(','),
          chainId: 0x5aff,
        }
  }
};

export default config;
An explanation of these changes can be found in Oasis docs here.
You can also add some TEST tokens from the Sapphire Testnet faucet if you haven’t already.
With all that in place, we can compile our project and deploy it via:
npx hardhat compile
and then:
npx hardhat run scripts/deploy.ts --network sapphire_testnet
This will output something like:
Deploying the contracts with the account: {your wallet address}
Privatar deployed to {contract address}
Hang on to the second value, the address, as we’ll use it in the frontend.
Now it’s time for the frontend.
Generate a SvelteKit project for the UI and API endpoints
We’ll start by adding the SvelteKit starter project.
From the root directory of our hardhat project:
npm create svelte@latest frontend
Then follow the options to create a skeleton project with TypeScript. This will stub out our SvelteKit frontend and after cding down to /frontend and running npm install, you can run npm run dev to take it for a spin.
Now that the frontend is stubbed out, we need to add 3 main pieces:
-
The standard web3 Connect button so users can connect their wallet to Sapphire and effectively “log in” to the dapp.
-
A profile form for uploading a photo and any other metadata we want to include. For now, we’ll provide fields for a photo, name, and a note.
-
Two API endpoints - one for the avatar URL and one for the profile URL that will return JSON formatted profile data.
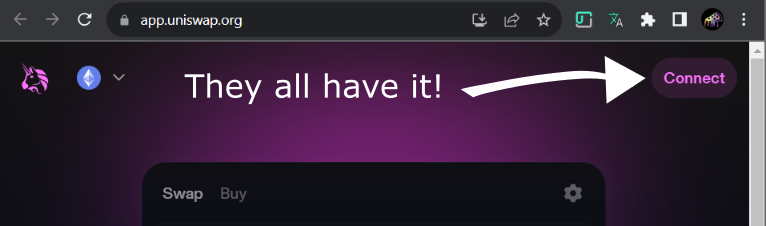
A Web3 wallet connect button
Nearly every web3 dapp has a shiny connect button that shows your wallet’s connection status. With Oasis Sapphire, it’s no different.
We’ll use ethers.js to connect to the user’s wallet, add the Sapphire network if it’s not already added, and then switch to it. For the purposes of this tutorial, we’ll be using Sapphire Testnet with TEST tokens rather than real ROSE (Oasis’s native token).
Svelte Stores to manage network connections
Before we start on the button itself, we can use Svelte’s powerful store type to create a listener which holds the current connection status and automatically updates the UI if it changes. We can then reuse that in a component for our button and other places that depend on an active connection.
First, we’ll add some model classes and network helpers to manage our connection to Sapphire:
src/lib/Models.ts
export interface Currency {
    name: string,
    symbol: string,
    decimals: number
};

export interface Network {
    name: string,
    chainIdHex: string,
    chainIdDecimal: number,
    rpcUrls: string[],
    blockExplorerUrls: string[],
    nativeCurrency: Currency
}
src/lib/Network.ts
import type { Network } from "./Models";
import { ethers } from "ethers";

const SWITCH_CHAIN_ERROR_CHAIN_NOT_ADDED: number = 4902;
const UNRECOGNIZED_CHAIN_ERROR: number = -32603;

export const OASIS_SAPPHIRE_TESTNET: Network = {
    name: "Oasis Sapphire Testnet",
    chainIdHex: "0x5aff",
    chainIdDecimal: 23295,
    rpcUrls: ["https://testnet.sapphire.oasis.dev"],
    blockExplorerUrls: ["https://testnet.explorer.sapphire.oasis.dev"],
    nativeCurrency: {
        name: "TEST",
        symbol: "TEST",
        decimals: 18
    }
}

function connectAccounts() {
    return window.ethereum.request({ method: 'eth_requestAccounts' });
}

function switchNetwork(chainId: string) {
    return window.ethereum.request({
        method: 'wallet_switchEthereumChain',
        params: [{ chainId: chainId }]
    });
}

function addNetwork(network: Network) {
    return window.ethereum.request({
        method: "wallet_addEthereumChain",
        params: [{
            chainId: network.chainIdHex,
            rpcUrls: network.rpcUrls,
            chainName: network.name,
            nativeCurrency: network.nativeCurrency,
            blockExplorerUrls: network.blockExplorerUrls
        }]
    });
}

export function connectWalletAndSwitchToNetwork(network: Network) {
    Promise.resolve(window.ethereum?.selectedAddress || connectAccounts())
    .then(getOasisNetworkConnectionStatus)
    .then(connectedToNetwork => !connectedToNetwork ? switchNetwork(network.chainIdHex) : true)
    .catch((error: { code: number; }) => {
        if (error.code === SWITCH_CHAIN_ERROR_CHAIN_NOT_ADDED ||
            error.code === UNRECOGNIZED_CHAIN_ERROR) {
            addNetwork(network);
        } else {
            throw error;
        }
    });
}

export async function getOasisNetworkConnectionStatus(): Promise<boolean> {
    try {
        const provider = new ethers.BrowserProvider(window.ethereum);
        const network = await provider.getNetwork();

        if (window.ethereum.selectedAddress && network.chainId.toString() === OASIS_SAPPHIRE_TESTNET.chainIdDecimal.toString()) {
            return true;
        }

        return false;
    } catch {
        return false;
    }
}
These are some functions that I’ve tuned over the years to hook up to a connect button and automatically add a network if it doesn’t exist and then switch to it, all in one fell swoop.
Now, before we create our Svelte stores, we need to move the contract ABI and address some place where our front end can use it.
Add contract ABI and address to the frontend
When we compiled our solidity contract, it generated a Privatar.json file that can be found at \artifacts\contracts\Privatar.sol.
Copy that and place it in /frontend/src/lib/contract/. That’s the contract ABI that we can use with typescript to interact with our contract on Sapphire.
Then, add a json file with the contract’s deployment address that we saved from earlier.
/frontend/src/lib/contract/contract-address.json
{ "Privatar": "your contract address" }
With those in place, we can create our Svelte stores:
import { derived, readable, type Readable } from "svelte/store";
import { getOasisNetworkConnectionStatus } from "./Network";
import { ethers } from "ethers";
import * as sapphire from '@oasisprotocol/sapphire-paratime';
import PrivatarArtifact from "$lib/contract/Privatar.json";
import contractAddress from "$lib/contract/contract-address.json";

export const connected = readable<boolean>(false, set => {
    const interval = setInterval(async () => set( await getOasisNetworkConnectionStatus() ), 1000);

    return function stop() {
        clearInterval(interval);
    }
});

export const signerAddress = readable<string>('', set => {
    const interval = setInterval(async () => {
        if (window?.ethereum) {
            set(window.ethereum.selectedAddress);
        }
    }, 1000);

    return function stop() {
        clearInterval(interval);
    }
});

export const privatarContract: Readable<ethers.Contract|undefined> = derived([connected, signerAddress], ([$connected], set) => {
    if ($connected) {
        let wrapped = sapphire.wrap(window.ethereum);
        new ethers.BrowserProvider(wrapped)
            .getSigner()
            .then(signer => {
                set(new ethers.Contract(
                    contractAddress.Privatar,
                    PrivatarArtifact.abi,
                    signer
                ))
            });
    } else {
        set(undefined);
    }
});

export const privatarContractUnsigned: Readable<ethers.Contract|undefined> = derived([connected, signerAddress], ([$connected], set) => {
    if ($connected) {
        set(new ethers.Contract(
            contractAddress.Privatar,
            PrivatarArtifact.abi,
            sapphire.wrap(new ethers.BrowserProvider(window.ethereum))));
    } else {
        set(undefined);
    }
});
The connected store simply polls the current Sapphire testnet connection and returns true or false.
signerAddress holds the currently connected account. This will change if for example you change your account in Metamask.
The two lower stores hold a reference to our Privatar contract using ethers. Whats unique about them is that they are using Svelte’s derived store type, so the have a dependency on the former two stores. If the connection or the wallet address ever changes, these contract instances will be re-instantiated so they always hold the correct connection based on what wallet and account is being used.
Of note are the sapphire.wrap() calls which wrap the provider to simplify the cryptography bits when interacting with Sapphire.
The Unsigned contract instance is there so we can make calls to Sapphire without signing the message first. For security reasons, msg.sender is zero’d out unless you sign the message.
We’ll use the signed instance when we need a valid msg.sender in our contract, and the unsigned instance for all other scenarios (i.e. view calls that don’t rely on msg.sender).
Now let’s make use of them in our connect button and our profile page.
A Svelte Connect button component
The connect button is rather simple now that all our network utilities are set up.
/frontend/src/lib/WalletConnection.svelte
<script lang="ts">
    import { OASIS_SAPPHIRE_TESTNET, connectWalletAndSwitchToNetwork } from "$lib/Network";
    import { connected, signerAddress } from "$lib/Stores";
    import { onMount } from "svelte";

    const handleConnectToSapphire = () => {
       connectWalletAndSwitchToNetwork(OASIS_SAPPHIRE_TESTNET);
    };

    function truncateWithCenterEllipses(str: string, maxLength: number) {
        if (!str) {
            return '';
        }

        if (str.length <= maxLength) {
            return str;
        }

        const ellipsis = '...';
        const ellipsisLength = ellipsis.length;
        const charsToShowBeforeEllipsis = Math.floor((maxLength - ellipsisLength) / 2);
        const charsToShowAfterEllipsis = maxLength - charsToShowBeforeEllipsis - ellipsisLength;

        const truncatedString =
            str.substr(0, charsToShowBeforeEllipsis) +
            ellipsis +
            str.substr(str.length - charsToShowAfterEllipsis);

        return truncatedString;
    }

    let providerFound: boolean = false;

    onMount(() => {
        providerFound = window?.ethereum;
    });
</script>

<div>
    {#if $connected}
        <span class="connected">
            <img src="/avatar/{$signerAddress}" alt="Avatar" height="32" width="32"/>
            {truncateWithCenterEllipses($signerAddress, 15)}
        </span>
    {:else if !providerFound}
        <a href="https://metamask.io/" target="_blank" rel="noreferrer">Install MetaMask</a>
    {:else}
        <button on:click={handleConnectToSapphire}>Connect to Sapphire</button>
    {/if}
</div>

//styles omitted for brevity...
A basic Svelte if block that either shows if were connected, if we have a wallet extension installed, otherwise a button to initiate the connection.
The button’s onclick is then hooked up to our network helper to handle adding and switching to Sapphire testnet.
Check the repo to see exactly how we place this button in the page header.
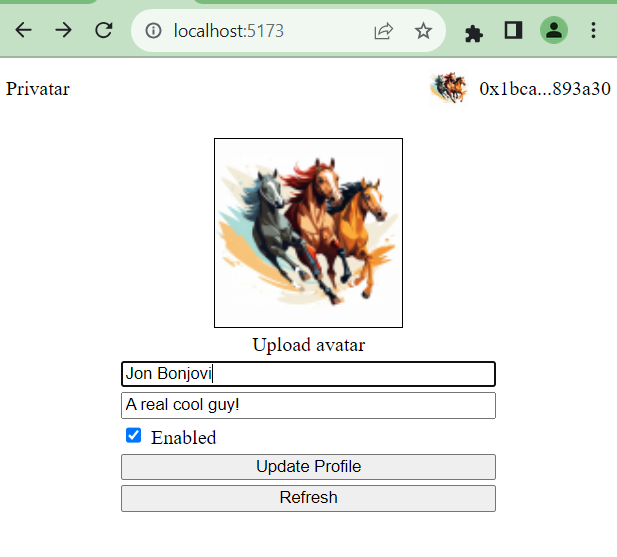
A profile page
For the profile page, we’ll update frontend/src/routes/+page.svelte to use a standard form element with fields for the avatar, name, and note, and then use our contract store to upload it to Sapphire.
For brevity, we’ve also added a refresh button that will (annoyingly) pop Metamask up for a signature request since we use msg.sender in our profile query function’s modifier. In a production app we could cache the signature and reuse it to prevent those popups.
Also of note is the <img src="/avatar/{$signerAddress}" /> which is actually pointing to the avatar API endpoint that we’ll create in a later step. Essentially making use of the dapp’s main feature, within the dapp itself.
<script lang="ts">
    import Header from '$lib/Header.svelte';
    import placeholder from "$lib/images/placeholder-150x150.png";
    import { privatarContract, signerAddress } from '$lib/Stores';

    let files: FileList,
        name: string,
        note: string,
        enabled: boolean = true,
        tx: Promise<any>;

    let image: HTMLImageElement;

    const toBase64 = (file: File) => new Promise((resolve, reject) => {
        const reader = new FileReader();
        reader.readAsDataURL(file);
        reader.onload = () => {
            let dataUrl = reader.result;
            let base64 = '';
            if (typeof dataUrl === 'string') {
                base64 = dataUrl.substring(dataUrl.indexOf(',') + 1);
                base64 = base64 + Array((4 - base64.length % 4) % 4 + 1).join('=');
                console.log(base64);
            }
            resolve(base64);
        }
        reader.onerror = reject;
    });

    const handleSubmit = async (event: Event) => {
        const avatarBase64 = files ? await toBase64(files[0]) : '';
        $privatarContract
            ?.updateProfile(name, note, avatarBase64, enabled, { gasLimit: 20_000_000 })
            .then(receipt => {
                tx = receipt.wait();
                (event.target as HTMLFormElement).reset();
                enabled = true;
                image.src = placeholder;
            })
            .catch(console.log);
    }

    const handleRefresh = async () => {
        try {
            const profile = await $privatarContract?.getProfile($signerAddress)
            name = profile.name;
            note = profile.note;
            enabled = profile.enabled

            if (!files) {
                image.src = `/avatar/${$signerAddress}`
            }
        } catch {}
    }
</script>

<Header />

<form on:submit|preventDefault={handleSubmit}>
    <label>
        <img bind:this={image} src="{files ? URL.createObjectURL(files[0]) : placeholder}" alt="New Avatar" />
        <input accept="image/png, image/jpeg" bind:files id="avatar" name="avatar" type="file" />
        Upload avatar
    </label>

    <input type="text" placeholder="Name" bind:value={name} />
    <input type="text" placeholder="Note" bind:value={note} />
    <label>
        <input id="enabled" type="checkbox" bind:checked={enabled} />
        Enabled
    </label>
    <button>Update Profile</button>
    <button on:click={handleRefresh}>Refresh</button>
    {#await tx}
        <span>Transaction pending...</span>
    {/await}
</form>
We’ll store the avatar as a base64 string as that was the first thing that came to mind other than dealing with raw bytes.
Here’s what it’s looking like:
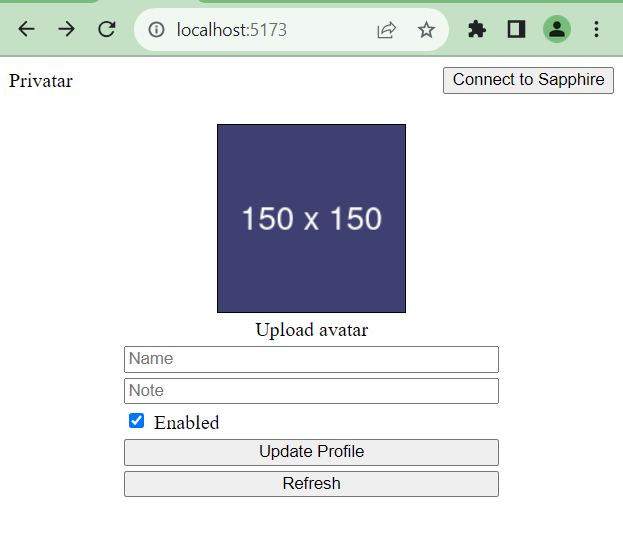
With the profile page done, users can now set up their profile and avatar.
To tie it all together, we’ll add API endpoints so that anyone can retrieve and display a users avatar if they have their wallet address.
Create Avatar and Profile API Endpoints
Now that users can upload images and profile data, we need API endpoints so that clients can access them.
We could go the Gravatar route of using an MD5 hash of an email, but since this is a simplified web3 tutorial, we’ll just work with public wallet addresses.
Perhaps you could imagine web3 dapps using an API like this to give some identity to the nameless wallet addresses that interact with them.
To add API endpoints in SvelteKit, we can use +server.ts files in the applicable routing folders. In our case, we’ll mimic the Gravatar avatar and profile request URLs by using /[address] and /avatar/[address] paths for the profile and avatar URLs, respectively.
The endpoints are fairly simple, as they only need to use the URL’s slug for the address and call our Sapphire functions.
The only notable difference is that we can’t use our Svelte stores in endpoints, so we’ll have to new up the contract again.
import { error, json } from '@sveltejs/kit';
import type { RequestHandler } from './$types';
import { ethers } from "ethers";
import * as sapphire from '@oasisprotocol/sapphire-paratime';
import PrivatarArtifact from "$lib/contract/Privatar.json";
import contractAddress from "$lib/contract/contract-address.json";
import { OASIS_SAPPHIRE_TESTNET } from '$lib/Network';

export const GET: RequestHandler = async ({ url, params }) => {
    const address = params.slug;
    const privatar = new ethers.Contract(
        contractAddress.Privatar,
        PrivatarArtifact.abi,
        sapphire.wrap(new ethers.JsonRpcProvider(OASIS_SAPPHIRE_TESTNET.rpcUrls[0])));

    const profile = await privatar.getProfile(address);

	return json({
		name: profile.name,
		note: profile.note,
		photo: `https://${url.host}/avatar/${address}`
	});
};
For the profile endpoint, we’ll add an HTTP GET, get the profile, and return it as JSON.
You’ll want to add better exception handling in a production-ready app.
import type { RequestHandler } from './$types';
import { ethers } from "ethers";
import * as sapphire from '@oasisprotocol/sapphire-paratime';
import basicUserAvatar from "$lib/images/default-avatar-96x96.png";
import PrivatarArtifact from "$lib/contract/Privatar.json";
import contractAddress from "$lib/contract/contract-address.json";
import { OASIS_SAPPHIRE_TESTNET } from '$lib/Network';

export const GET: RequestHandler = async ({ params, setHeaders, fetch }) => {
    const address = params.slug;
    const privatar = new ethers.Contract(
        contractAddress.Privatar,
        PrivatarArtifact.abi,
        sapphire.wrap(new ethers.JsonRpcProvider(OASIS_SAPPHIRE_TESTNET.rpcUrls[0])));

    let avatarBase64;
    try {
        avatarBase64 = await privatar.getAvatar(address);
    } catch {
        const response = await fetch(basicUserAvatar);
        avatarBase64 = Buffer.from(await response.arrayBuffer()).toString('base64');
    }

    const imageBytes = Buffer.from(avatarBase64, 'base64');

    setHeaders({
        'Content-Type': 'image/jpeg'
    });

    return new Response(imageBytes);
};
The avatar endpoint is a little more complex, as we need to convert the image base64 as bytes and set a proper content type on the response.
We’ll also add a fallback placeholder image in the scenario that no avatar exists.
With that set up, we can try uploading an avatar to our own account and see that the header avatar now works!
Go ahead and check that our /{wallet-address} and /avatar/{wallet-address} work as expected.
That completes our Gratavar clone dapp. Please check out the repo for any details we left out and feel free to message me on X (@joe_ptrkv_ch) if you have any questions. You can also try the dapp out via https://privatar.brosette.dev/.