 Created by Joe Petrakovich
You’ve been told “just use Voicemeeter” to solve your audio routing troubles, but after a few moments of fumbling with its mess of buttons and knobs, you gave up!
The good news, you absolutely can master your audio’s routing with Voicemeeter.
In this guide, I’ll show you both how to set it up and how to think about it so you’ll come away feeling like an expert.
- Which version should you use?
- Downloading and Installing Voicemeeter
- Understanding The Layout
- The Buses
- Getting Started
- Configuring your hardware inputs (microphone)
- Configuring your hardware outputs (speakers, headphones)
- Connecting a hardware input to a hardware output using a bus
- Virtual Inputs and Outputs
- Configuring your virtual inputs (apps, browser, games)
- Configuring your virtual outputs (used as app inputs)
- Final Tuning
- That’s it!
Which version should you use?
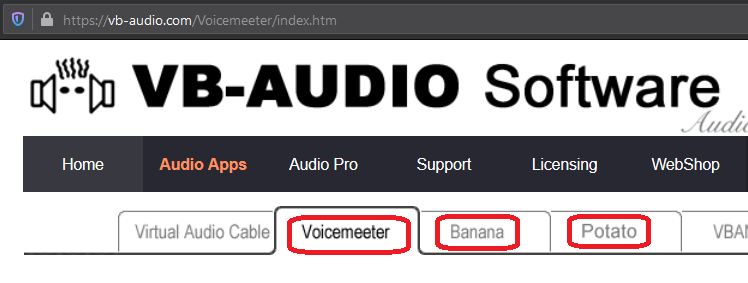
Voicemeeter currently comes in three different versions: Voicemeeter, Voicemeeter Banana, and Voicemeeter Potato.
The difference between them comes down to the number of advanced features that are included, and the number of different routes you can create.
Voicemeeter Banana is the Goldilock’s “just right” middle option and should cover most folk’s needs, but if you decide to download Potato, it will also download the other two versions with it, so you can change your mind without too much hassle.
This guide will focus on Voicemeeter Banana, but it applies to the other versions as well.
Downloading and Installing Voicemeeter
Voicemeeter Banana can be acquired using one of the download links at https://vb-audio.com/Voicemeeter/banana.htm.
The EXE or the ZIP is fine, but you’ll need to extract the ZIP first before you can get to the installer.
Once downloaded, open the installer and install it to Windows like you would with any other application. You will be instructed to restart your computer, which you should do before moving on.
Once you’ve restarted, go ahead and open Voicemeeter Banana from your start menu.
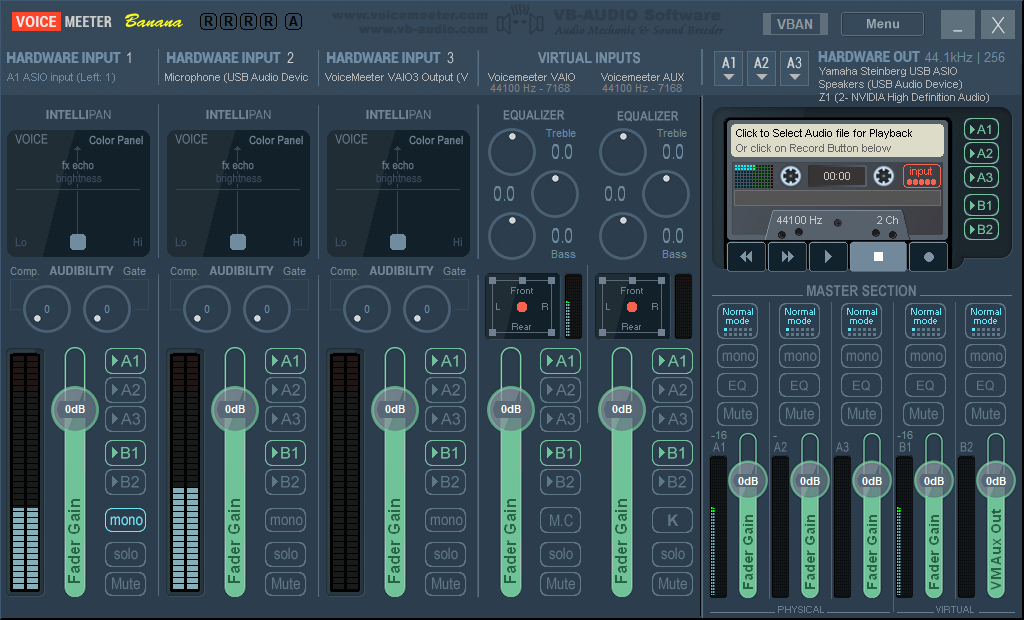
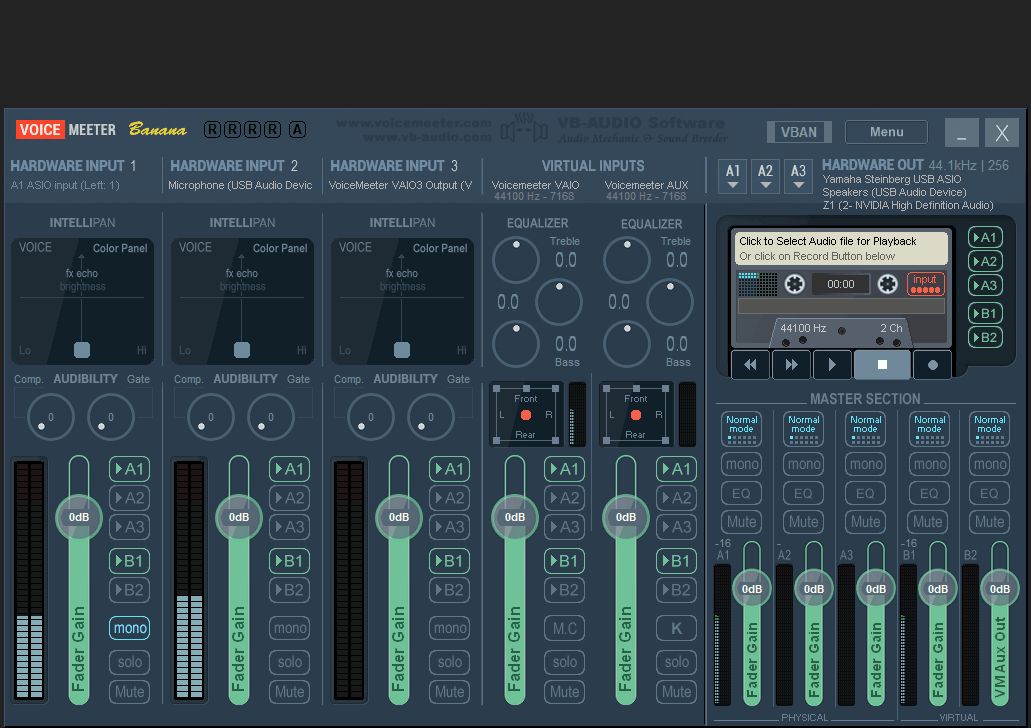
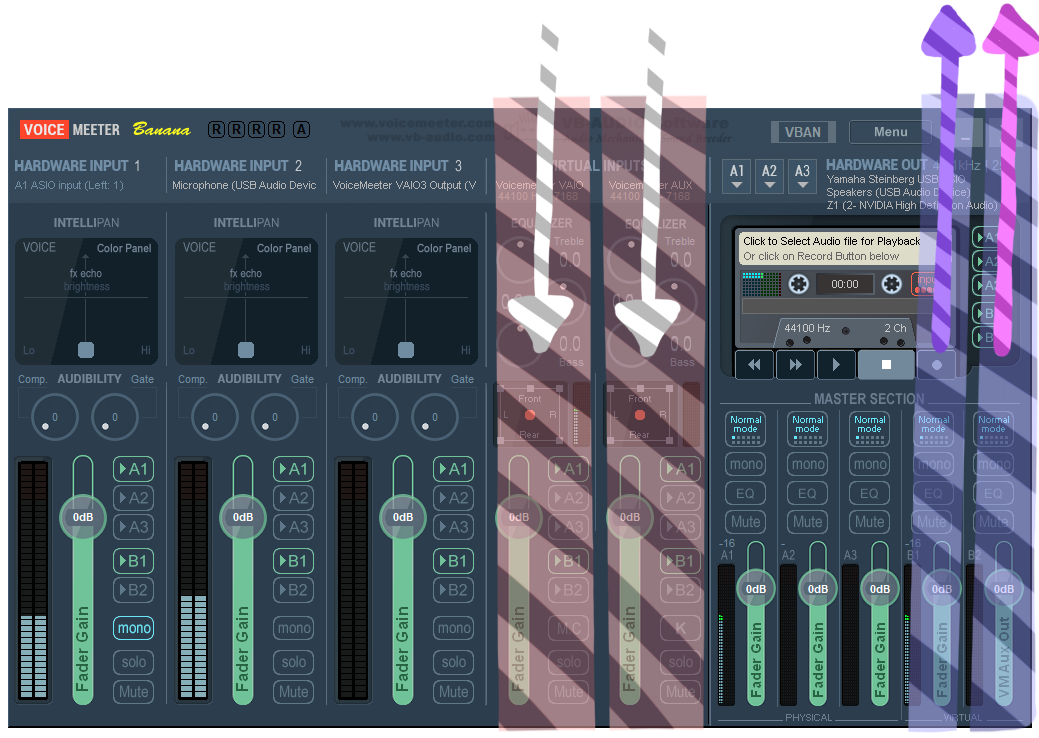
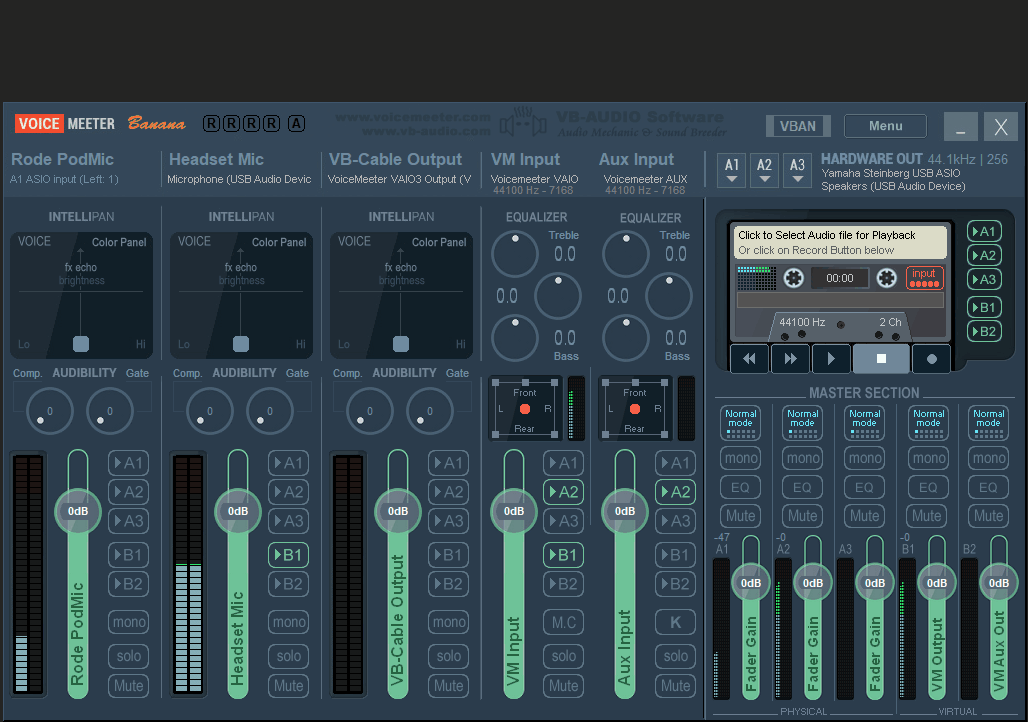
Understanding The Layout
Voicemeeter looks confusing at first, with all those buttons, dials, and bouncing volume bars, but we’ll make sense of it one layer at time.
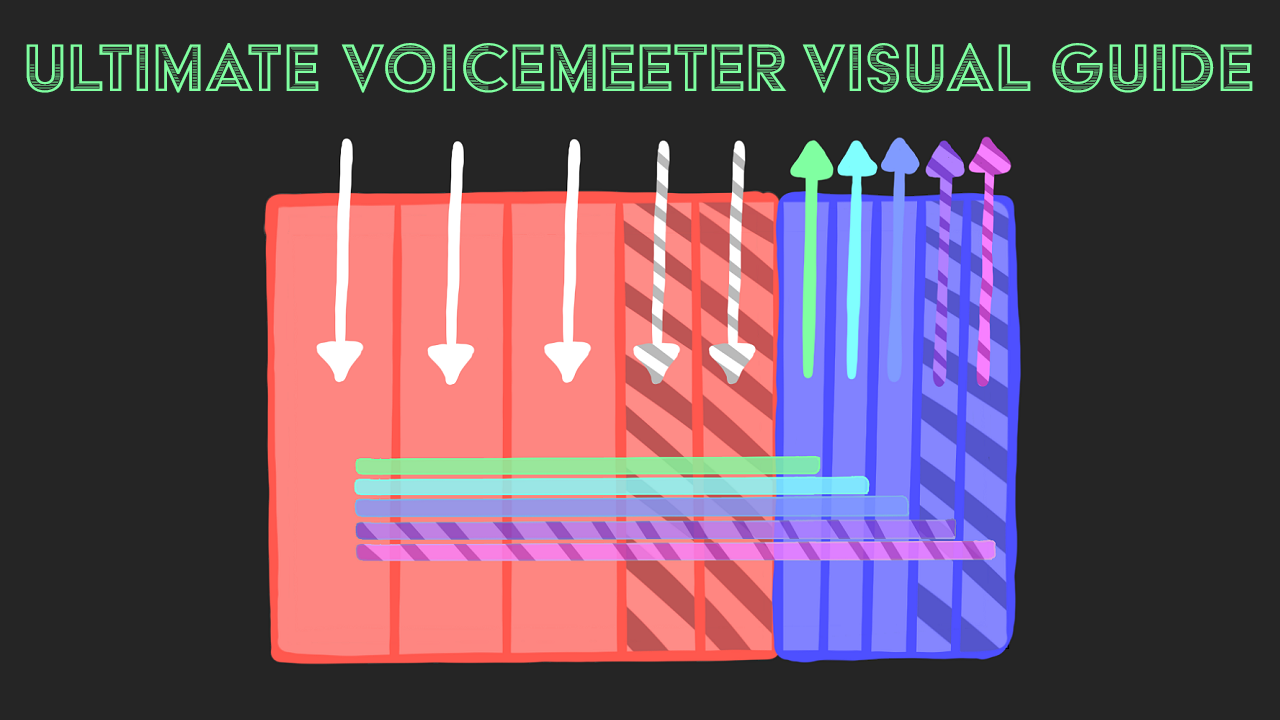
Imagine Voiceemeter as a box with sound coming into it and out of it.
The left side of Voicemeeter is the sound coming in.
The right side is the sound going out.
The left (input) side, is made up of 3 hardware inputs and 2 virtual inputs.
The hardware inputs are for sound coming from physical devices like microphones and instruments.
The virtual inputs are for sound coming from software applications like audio coming from YouTube in your browser.

The right (output) side is made up of 3 hardware outputs and 2 virtual outputs.
The hardware outputs are for the physical devices that can play sound like your speakers and headphones, or even out to capture card that connects to separate streaming PC.
The virtual outputs are for connecting to software applications that receive sound (usually directly from a microphone), like a Skype call or a Discord voice chat.

Think of Voicemeeter as the one-stop shop for all incoming and outgoing audio.
After configuring all the sound going into Voicemeeter and mixing it (or separating it), you’ll make use of Voicemeeter’s hardware and virtual outputs to send it where you want.
The Buses
Since Voicemeeter Banana provides 5 outputs (3 hardware and 2 virtual), that gives you 5 different routes that audio can be placed on.
You can think of these routes the same way as you might think of school bus routes on a map. And like a school bus, it can carry more than one different sound at a time, so you can mix and match!
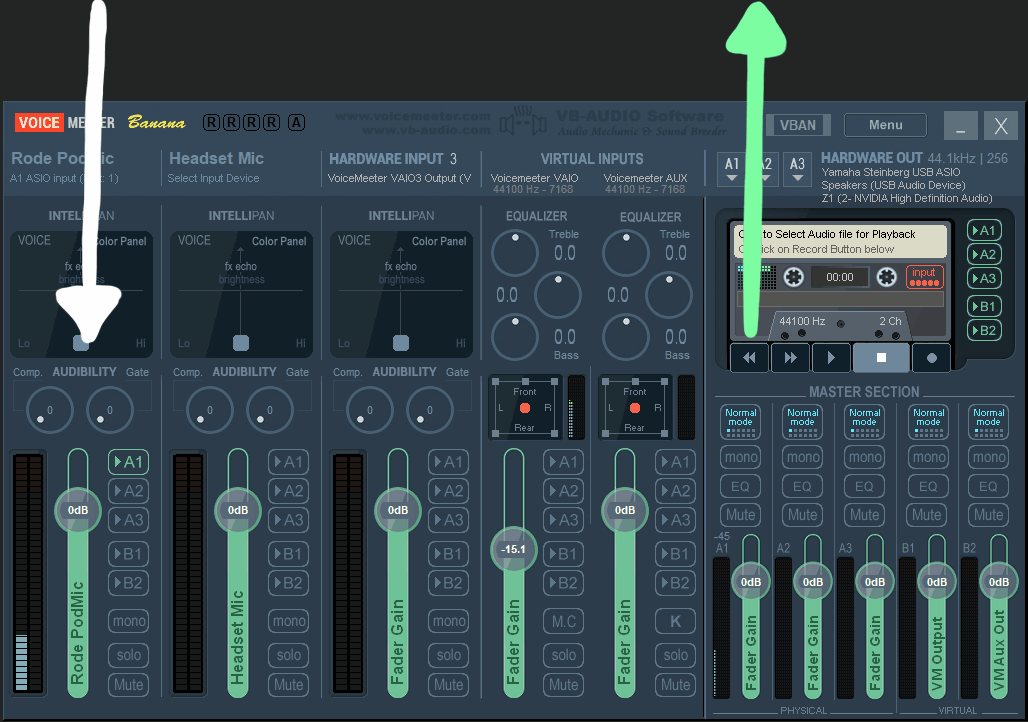
In Voicemeeter, the buses are seen as the A1, A2, A3, B1, and B2 buttons vertically aligned on each left (input) side strip. That is the starting point of the bus route.
Then, each bus route leaves Voicemeeter on one of the five right (output) side hardware or virtual outputs.
It’s up to you to tell Voicemeeter which bus route the left side inputs should take - and they can take more than one route at a time!
Here’s what it looks like with all the layers.
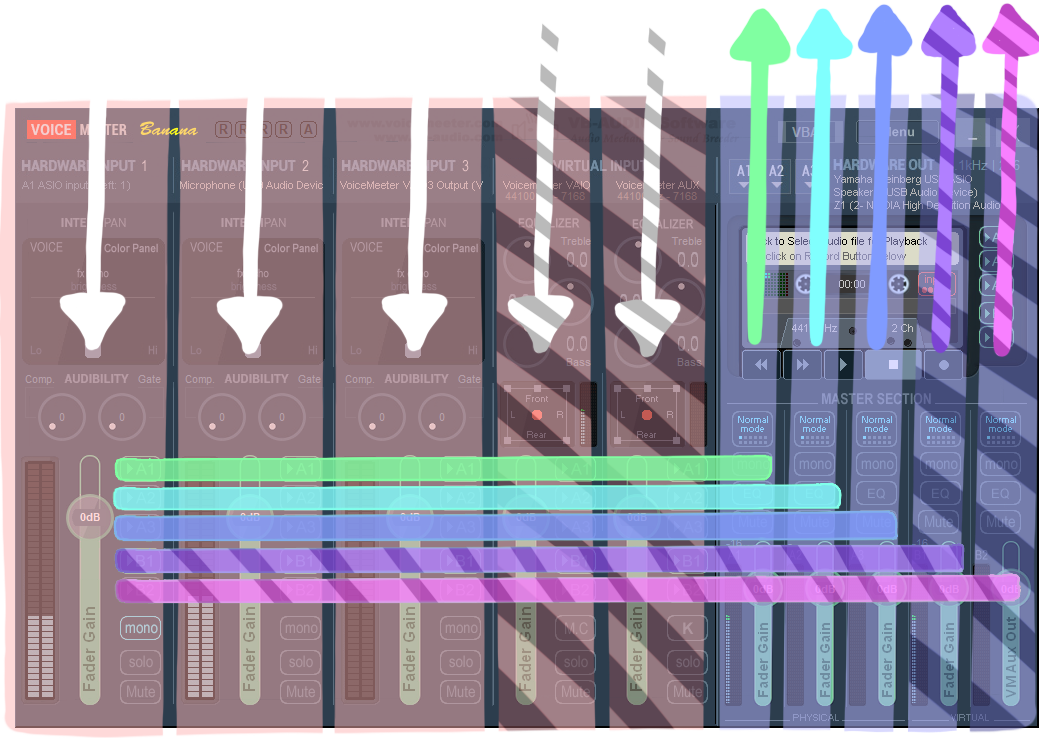
Not so bad, right?
Sound comes in, you assign it to a bus to mix and match, and make use of the final outputs.
Getting Started
Now that you have a better understanding of the layout - the ins, the outs, and the buses, lets configure Voicemeeter so we can actually use it to route audio.
Before we begin, go ahead and disable all the currently active buses by clicking the highlighted A1 and B1 buttons on each of the left columns.
Voicemeeter enables the A1 and B1 bus by default on all the inputs for convenience, but it will make more sense if we start with them turned off.
Once you have that done, we’ll start by configuring the sound that goes into Voicemeeter - the Voicemeeter Inputs.
Configuring your hardware inputs (microphone)
The left side of Voicemeeter is meant to hold your hardware inputs like your microphone or an instrument like an electric guitar.
Configuring your microphone is different depending on how it connects to your computer. If it connects by USB or is built into your computer or laptop then keep reading. If it connects through an audio interface device, skip to the next step.
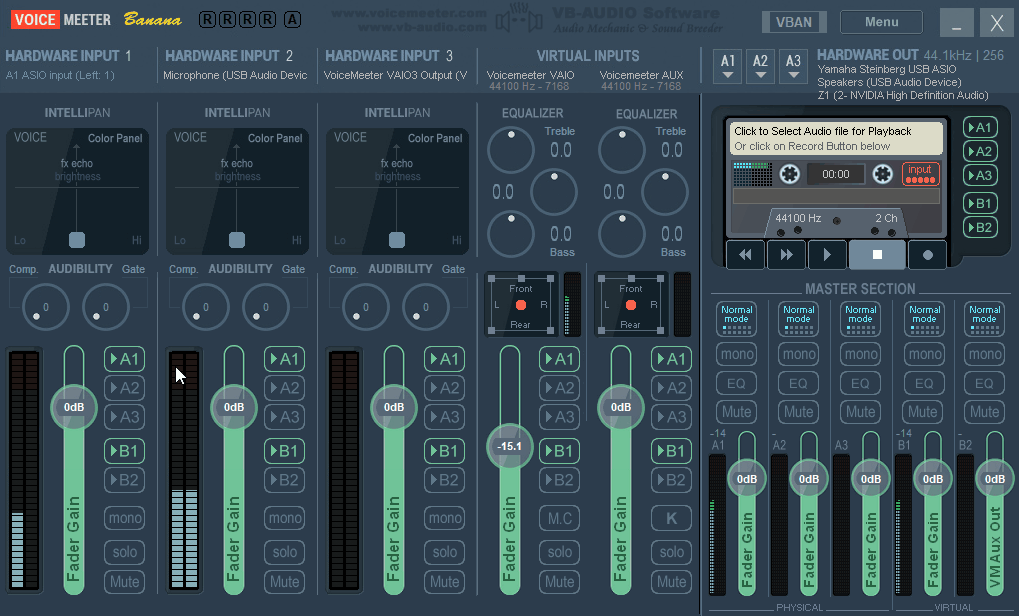
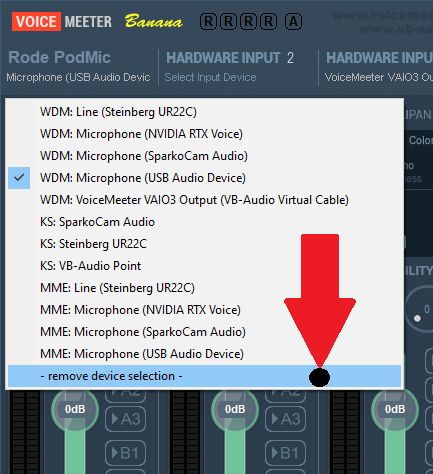
If your microphone connects to your computer by USB, the simplest way to do this is to click near the top of the left strip right below where it says “Hardware Input 1” and select your microphone from the list.
You’ll notice when you click that area, the list that pops up has a bunch of acronyms like WDM and MME. Those represent different audio protocols that can be used. For the most part they are ordered from top to bottom, where the higher in the list they are, the better the quality.
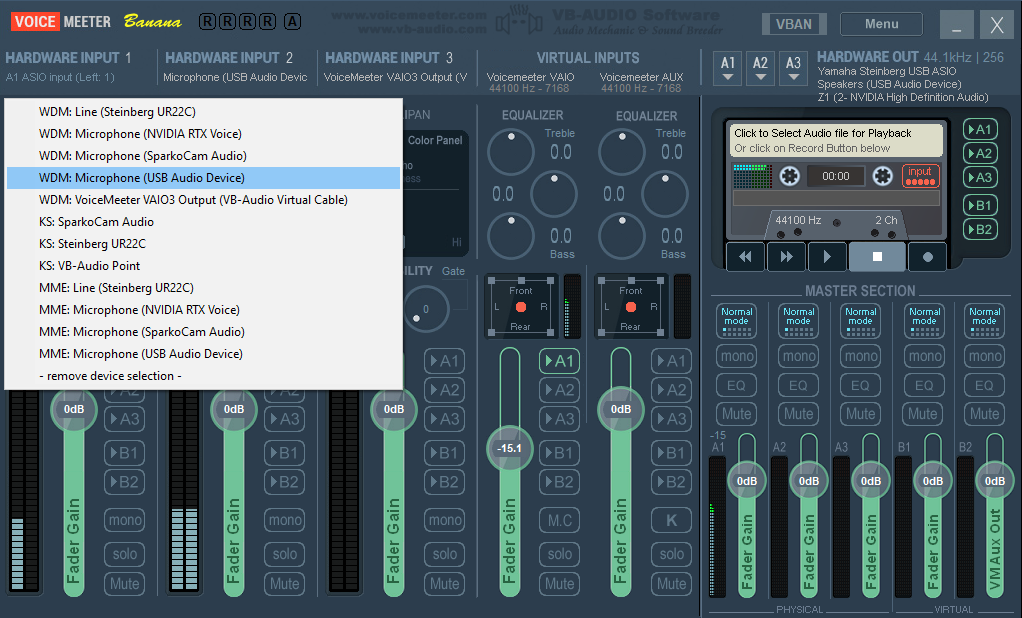
Select your microphone wherever it appears first from the top of the list.
Once selected, if your microphone is working properly, you should see the bar begin to dance with the incoming sound but you won’t hear anything because we’ve disabled the buses and we haven’t configured the outputs! We’ll get to that soon.
It’s also a good idea to name your devices in Voicemeeter. Do that by right-clicking the title of the strip where it says “Hardware Input 1”, give it a name, and press enter to set it.
Using an Audio Interface that supports ASIO? Do this instead.
If your microphone is connected using the more traditional XLR-style connectors to an audio interface device, we’ll set that up a bit differently.
Audio interface devices usually use the ASIO protocol, which is superior to WDM and the other protocols, so you’ll want to make use of it if you can.
To set it up, if you already did the prior step or if Voicemeeter tried to default the leftmost input for you, you’ll want to undo that by clicking on your selected microphone option at the top of the strip and then clicking “- remove device selection -“ to unset it.
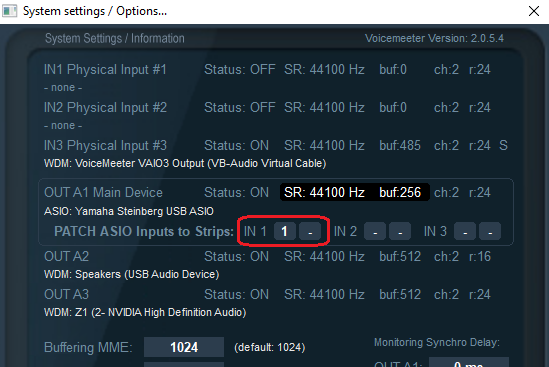
Then in the top right corner of Voicemeeter, click “Menu”, “System Settings / Options” and look in the section of the settings window that says “OUT A1 Main Device”, you should the ASIO driver from your audio interface specified.
Under the name of your ASIO driver, see where it says “PATCH ASIO Inputs to Strips”? That is how you configure Voicemeeter to route your audio interface directly into Voicemeeter.
You can route it to any of the three hardware inputs, defined as IN 1, IN 2, and IN 3 by right-clicking in one of the two squares that represent the left and right audio channels.
For my dynamic microphone, I selected 1 for the left channel, because my microphone is a single channel device plugged into port 1 on my audio interface.
Once selected, you should see the leftmost input strip change to display “A1 ASIO Input” back on the main Voicemeeter window, and if your microphone is connected, the bar should now be dancing up and down with incoming sound.
Configuring your hardware outputs (speakers, headphones)
There are still more inputs to configure, but we’re going to jump over to configuring the hardware outputs so you’ll be able to actually hear something, as well as get an early understanding of the way audio flows through Voicemeeter.
In Voicemeeter Banana, the hardware outputs are bound to the end of the A1, A2, or A3 buses, so if we bind our computer speakers to the A1 Hardware Output, then any sound that rides the A1 bus will come out of those speakers.
To bind the A1 output, click the A1 box in the top right corner and select one of your connected hardware devices. Again, the WDM version is usually best, unless you have an ASIO device, in which case you’ll likely want to use the ASIO option.
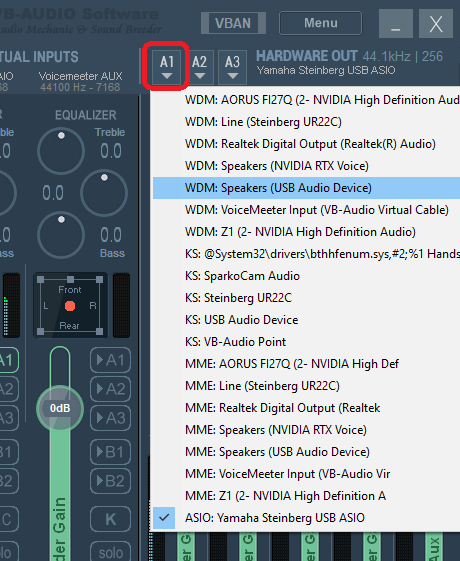
If you have other hardware devices separate from your speakers, like a pair of USB headphones, go ahead and bind those to the A2 or A3 hardware output.
Note: If your headphones are the kind that connect directly to your computer speakers, then those will go together like a 2-in-1 on the A1 output.
Connecting a hardware input to a hardware output using a bus
Now that you have your microphone bound to a Voicemeeter input, and your speakers and/or headphones bound to a Voicemeeter output, you can get a feel for basic routing by connecting them together using the buses.
Go ahead and temporarily route your microphone audio to your speakers or headphones by activating the A1 Bus on the hardware input that your microphone is bound to (click the A1 button on the relevant input strip.)
Now if you speak into your microphone you should be able to hear it from whichever device you bound to the A1 hardware output in the previous step.
If you have speakers bound to A1 instead of headphones, be sure to undo this by deactivating the A1 Bus as soon as your done testing this - if you leave Voicemeeter configured this way, you might start getting a feedback loop as the sound travels from your speakers back into your microphone over and over!
This was just a test!
Now you can experiment by enabling/disabling the A1 and A2 Buses to see what happens. You should see that you now have control over where your microphone audio travels based on which bus is activated for that input strip.
With that in mind, we can start configuring the virtual inputs and outputs, so you can start taking control of the sound going into and out of computer applications and games.
Virtual Inputs and Outputs
Whenever you install an application on your computer - be it a browser, a video game, or anything else, as long as it makes sound (alert sounds, voice or video calls, game sound effects), it will almost always allow you to choose the audio input and output device that it will use.
For example, if you make Skype calls, you will have to choose an input device for the microphone and an output device so you can hear the person you are calling.
If you don’t manually choose those devices, it will use the system default devices. Later we will see how to set Voicemeeter’s virtual devices as your default devices so that all PC sound will (by default) go in and out of Voicemeeter.
Voicemeeter Banana comes with two virtual inputs, that is, two different ways for application audio to get into Voicemeeter so that you can route it on a bus.
It also comes with two virtual outputs which we’ll discuss in a later section.
For one reason or another, it was this part that always confused me because the inputs and outputs are swapped when setting this up.
You’ll be using a Voicemeeter input for your app or game output, and you’ll be using a Voicemeeter output as your app or game input.
The app or game audio is going out of the app or game and into Voicemeeter, and if the app or game requires an audio input like a microphone, you would use a Voiceemeter output that has your microphone’s audio routed to it.
Another example - when using Voicemeeter with a streaming application like OBS Studio or Streamlabs OBS, you’ll use the Audio Input Device source to make use of the routed sound within Voicemeeter - and you’ll be setting it to a virtual output.
Make sense?
Configuring your virtual inputs (apps, browser, games)
In this step, we’re going to send audio from an application into Voicemeeter so it can be routed on a bus just like our microphone audio.
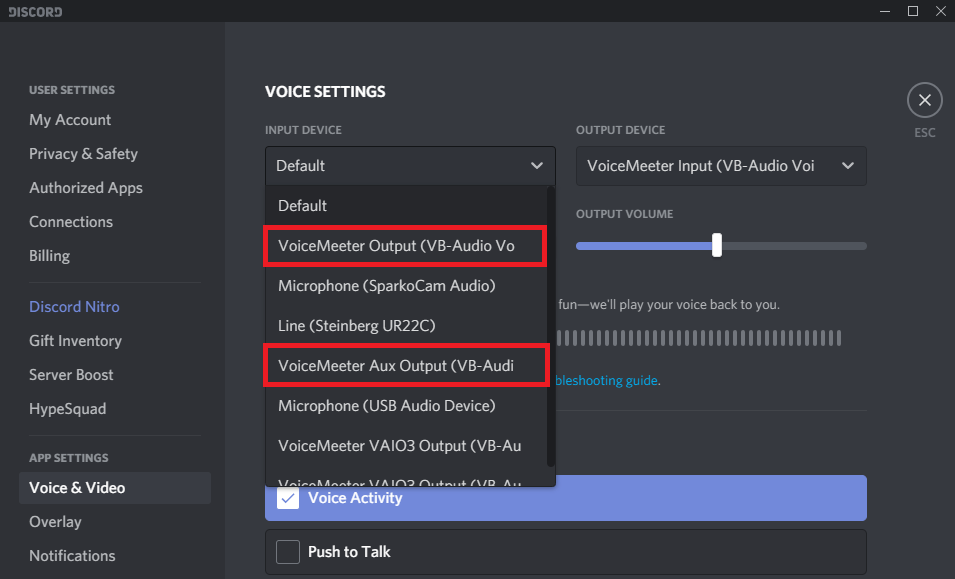
In this example, I’ll use the Discord app, but you should be able to use anything that lets you configure the audio input and output devices.
In Discord, the audio settings are found by clicking the settings gear icon near your username, opening the “Voice & Video” tab from the app settings section, and putting your attention on the two drop-down menus for Input Device and Output Device.
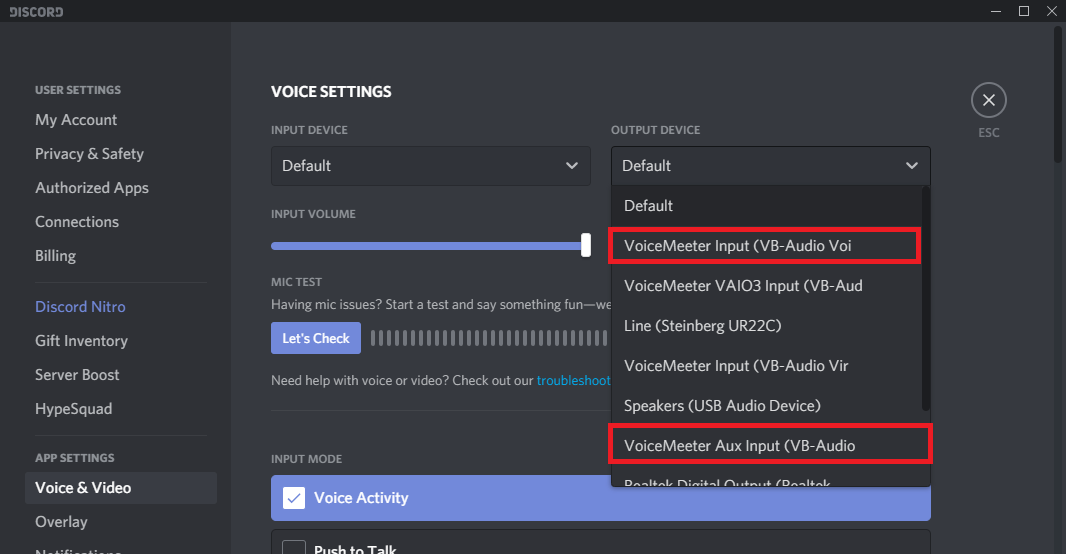
To send our Discord audio into Voicemeeter so we can control where it ends up, select the Output Device drop-down menu and choose either Voicemeeter Input or Voicemeeter Aux Input.
Ignore that VoiceMeeter VAIO3 Input item in the drop-down - that’s an extra one since I also use Voicemeeter Potato.
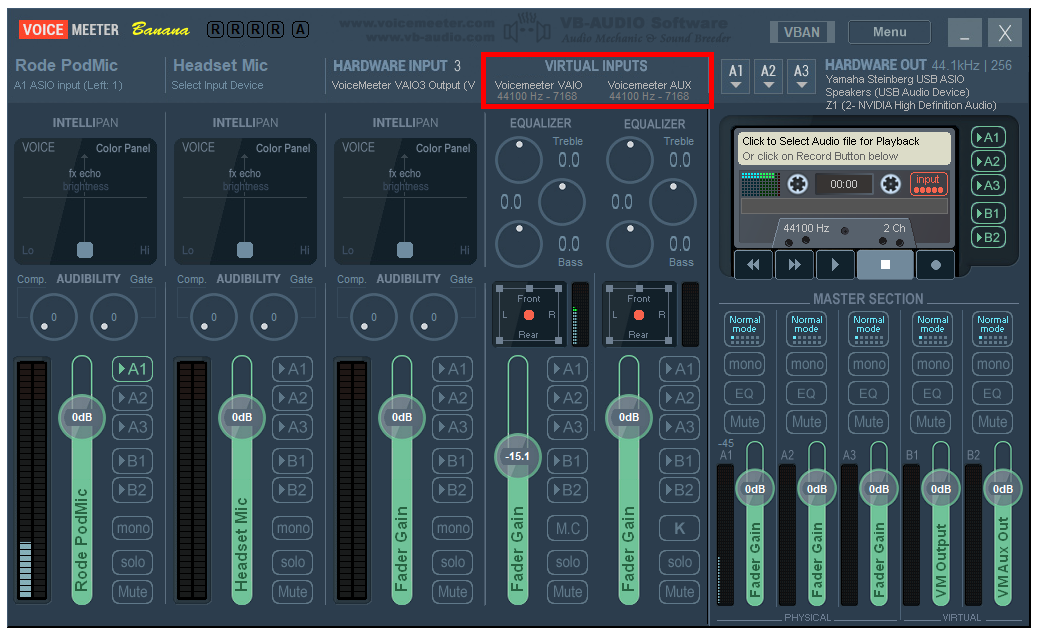
If you take a look back at the Voicemeeter main window, the two virtual inputs are in the middle, next to the three hardware inputs.
This is another area where I think Voicemeeter could be less confusing… Voicemeeter Input is the first one, labeled Voicemeeter VAIO at the top, and the Voicemeeter Aux Input is the second one, labeled Voicemeeter AUX at the top. Aux just means “auxiliary” or… the other one.
This confused me because you kind of just have to know that the one labeled “VAIO” is the same as “Voicemeeter Input” in Discord.
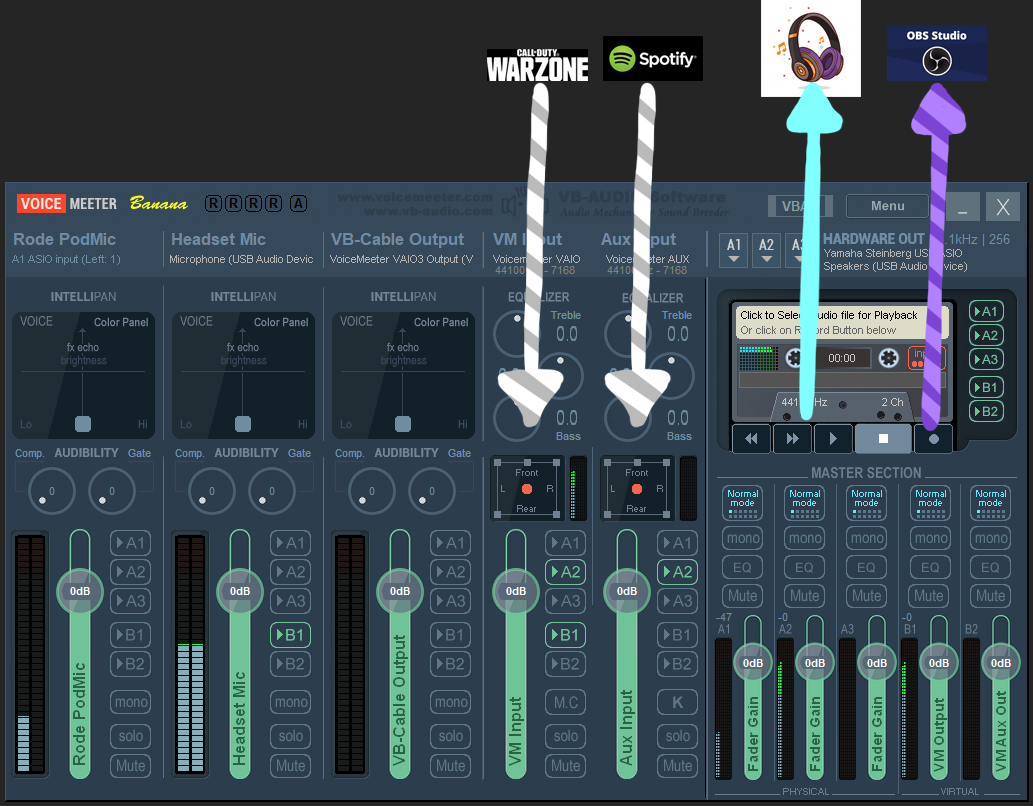
You can strategically use Voicemeeter’s two virtual inputs to separate your audio.
Perhaps your streaming a game on Twitch and you want to listen to a Spotify playlist - but you don’t want your viewers to hear it because of DMCA take-downs.
You could route your Spotify app output to the Voicemeeter Aux Input, route that on the bus that leads to your headphones. Then have your game audio on the other Voicemeeter virtual input, routed on two buses - the one that goes to your headphones (same as Spotify) so you can hear it, and on a different bus that leads to your streaming software, perhaps an Audio Input Source in OBS Studio.
Voicemeeter Potato comes with an additional virtual input and output, in case you need another.
Pro Tip: Right-click in the space above the Voicemeeter VAIO label and add a name that helps you remember what it is. I named mine “VM Input” and “VM Aux Input”. It also puts the name inside the green volume slider which is nice.
Once you’ve selected your Discord Output Device, your Discord sound is now traveling into Voicemeeter.
Is it starting to make sense?
The final piece of the puzzle is to make use of Voicemeeter’s two virtual outputs.
Configuring your virtual outputs (used as app inputs)
Voicemeeter Banana provides two virtual outputs that deliver the sound riding on bus B1 and B2. This allows you to send mixed or separated sound into other applications where you would normally connect a microphone.
There isn’t much visual indication in Voicemeeter to make you aware of the B1 and B2 output other than the existence of the B1 and B2 buses, and the virtual sub-section at the bottom right of the Voicemeeter window.
However, if you go back to Discord, on the same page as the output device we configured in the last step, you should see the Voicemeeter Outputs listed as an item in the “Input Device” drop-down menu.
You’ll just have to know that “Voicemeeter Output” is the sound from the B1 bus, and “Voicemeeter Aux Output” is the sound from the B2 bus.
Pro Tip: Right-click the green gain bar on the B1 and B2 Master Section and label them so you remember the names. I named mine “VM Output” and “VM Aux Output”.
Try choosing either Voicemeeter output within Discord and use the Mic Test function to observe what happens when you pipe sounds along the B1 or B2 bus.
Can you see how this would allow you to route more than just microphone audio into an app?
Final Tuning
At this point, we’ve handled the standard use cases for Voicemeeter.
We set up our hardware and virtual inputs so that Voicemeeter can receive sound from our microphones and our apps and games.
We configured the hardware outputs so we have some way to hear the sound ourselves.
We made use of the Voicemeeter virtual outputs within our games and apps so we can send mixed sound in to them.
And finally, we enabled or disabled the various buses to control where all the sound is routed.
Give yourself a big ol’ pat on the back because you now have Voicemeeter under your control!
Before we end, there’s some crucial tuning you should do to prevent weird sound issues like crackling and popping, and some optional settings to adjust that will make using Voicemeeter a bit more convenient.
Setting the default playback device
I like to use Voicemeeter as a complete replacement for all sound controls in Windows. You can do this by setting one of the Voicemeeter inputs as the default playback device so that all PC sound will pipe into Voicemeeter by default.
To set this up in Windows, go to the Control Panel, click “Hardware and Sound”, and then click “Sound” to bring up the sound control panel.
On the “Playback” tab, scroll down to find the two Voicemeeter virtual inputs.
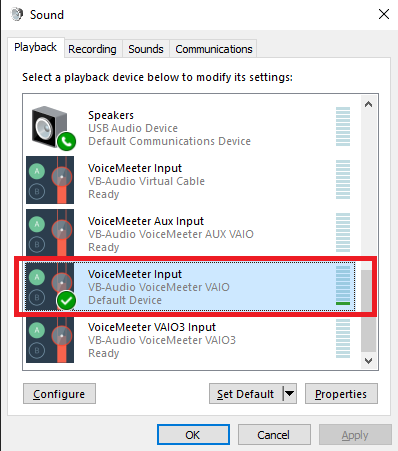
Right-click the one you want to be your default playback device - I use “VoiceMeeter Input” rather than the aux input so all my PC sound will go through the first virtual input strip labeled “Voicemeeter VAIO” at the top.
Once this is set, try playing some music or a video via YouTube. If you can’t hear it, it’s because you don’t have that Voicemeeter input routed on a bus that leads to your speakers or headphones!
Setting the default recording device
This step is similar to the prior one in that we can set one of Voicemeeter’s two virtual outputs to be considered the default recording device in Windows. That means whenever an application requires an input device like a Microphone, it will default to using one of Voicemeeter’s outputs.
You don’t have to do this, but it can be convenient when installing new apps to have them default to using Voicemeeter.
To set this up in Windows, go to the Control Panel, click “Hardware and Sound”, and then click “Sound” to bring up the sound control panel.
On the “Recording” tab, scroll down to find the two Voicemeeter virtual outputs.
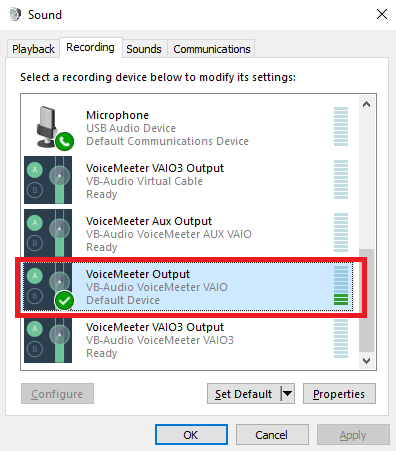
Right-click the one you want to be your default recording device - I use “VoiceMeeter Output” so that by default, apps needing an input device will use the B1 virtual output.
Set all matching sample rates in Windows and Voicemeeter.
Whenever folks complain about popping or crackling audio, it is very often because of mismatched sample rates in Windows and Voicemeeter.
The audio sample rate is kind of like a file format, and your audio will sound best if it is streamed using a constant sample rate.
Sometimes when setting up Voicemeeter, Windows will be playing your audio at one sample rate, and Voicemeeter will be playing at a different one, resulting in crackles and pops as it has to convert from one to the other.
To prevent all of that, it is a good idea to set all of Windows playback and recording devices to the same sample rate, and also set them the same in Voicemeeter.
To complete this step, go back to the sound control panel in Windows and right-click each of the playback and recording devices, go to Properties, Advanced tab, and set the Default Format to be the same value across all of them. I chose the 2 channel, 24 bit, 44100 Hz (Studio Quality) setting.
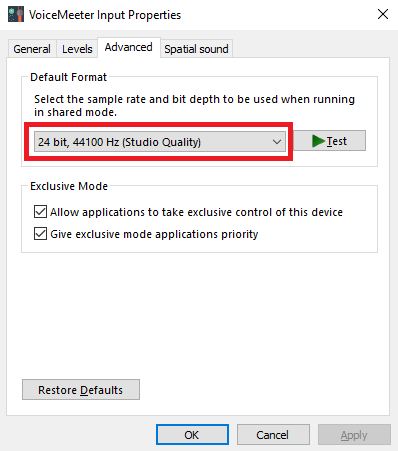
Set this on all of them - Voicemeeter Input, Voicemeeter Aux Input, Voicemeeter Output, Voicemeeter Aux Output.
You may also want to set this to match on the other playback and recording devices just to be consistent.
Note: If you have a separate audio interface device, it will have its own sample rate. It is best to match that rate within Windows and Voicemeeter.
Once you have set that on all the playback and recording devices, it’s time to set it in Voicemeeter.
Within Voicemeeter, go to the Menu in the top right corner, go to System Settings / Options, and ensure that the “Preferred Main SampleRate” setting is also set to the same Hz value as the one you set in Windows (that was 44100 Hz for me).
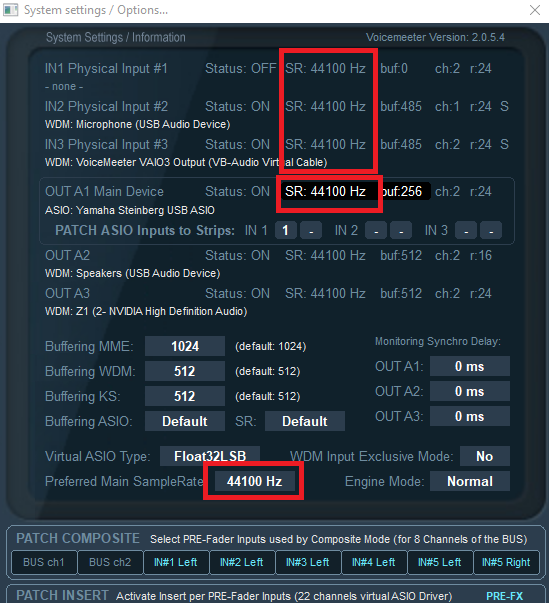
You should also now see that the same Hz value is displayed under the label of the two Voicemeeter inputs and next to the “Hardware Out” label.
Did you do it?
Excellent.
Pro Tip: Sometimes the audio will stop after making settings changes in Voicemeeter. You can usually fix this by clicking the Menu button and then clicking “Restart Audio Engine”.
Make Voicemeeter always-on
One more step.
Now that you have everything configured nicely, we want Voicemeeter to open (and stay open) in Windows even after we restart the computer.
You don’t have to do this if you aren’t going to be using Voicemeeter every day like I do.
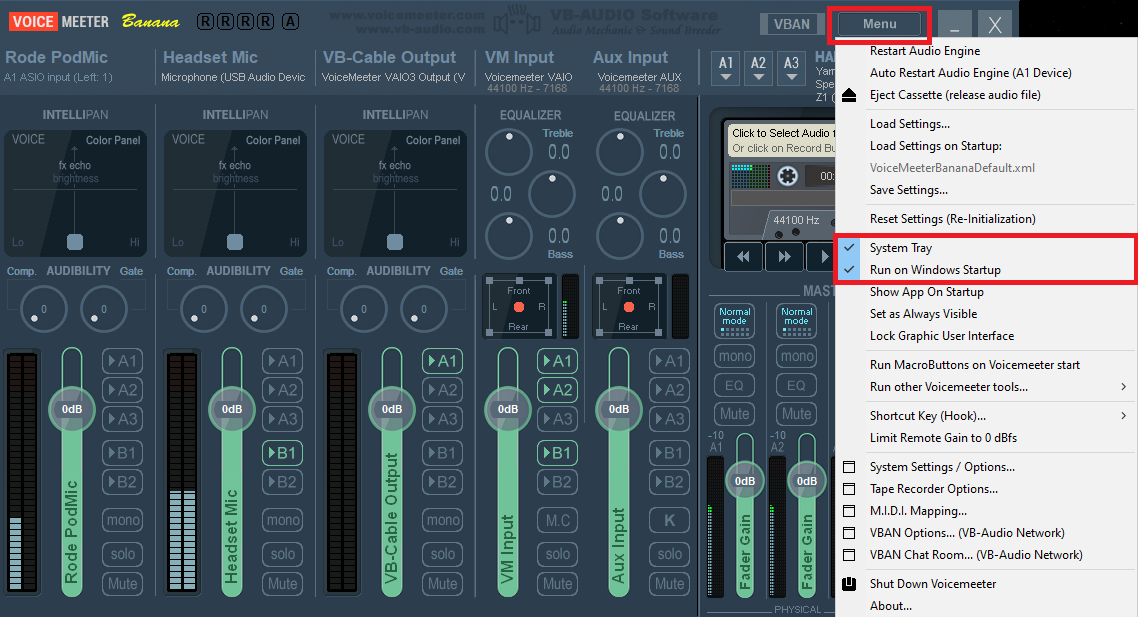
To do this, simply click the Menu button in Voicemeeter and click both “System Tray” and “Run On Windows Startup” options from the list.
Once completed, you can even close Voicemeeter with the “X” at the top right corner and it will continue running.
You can open it back up from the system tray in the bottom right corner of Windows.
That’s it!
You’ve done it!
Voicemeeter is now fully set up for mixing and routing your sound.
If you found this guide helpful, please share it using this link or put your email below to be notified whenever I have another guide ready for you to enjoy.